
Chapter 5: Geospatial Data Management
Adapted from Kristin Briney’s Data Management Workbook
Why do Data Management?
Most of us have spent time at some point digging through our computer to find a specific file that can’t be located. It’s incredibly frustrating and a waste of time and resources, especially if you end up recollecting missing data. The good news is that it is possible to avoid this situation entirely by strategically managing your data better.
Done well, data management means:
- always understanding what your data is and how you collected it even if the data is a year old
- always finding the file you need quickly
- never losing your data even if your hard drive crashes
- knowing what rights and responsibilities you have over your data
- knowing how and where to share your data to comply with your funder’s data sharing policy
- being able to pick up and easily reuse data from a past project
Geospatial data types:
Adapted from the DCN specialized curation curriculum
Geospatial data can be messy and therefore good data management is necessary to keep data functioning in additions to the reasons to manage data above.
This is a quick guide to common file types and the software they can be access in (not exhaustive).
| Extension | Description | QGIS | ArcGIS Pro | R, Python | Text Editor |
|---|---|---|---|---|---|
| .shp .dbf .shx .sbx .sbn .prj .xml .cpg .qmd | shapefile | Y | Y | Y | N |
| .json .geojson | object files suitable for websites | Y | Y | Y | Y |
| .kml .kmz | keyhole markup (Google) | Y | Y | Y | Y |
| .csv | comma separated values | Y | Y | Y | Y |
| .gdb | Geodatabase | Y | Y | Y | N |
Shapefile
One of the most common vector File formats out there is the Esri Shapefile. The “shapefile” is, in fact, a set of related files with the same filename and different extensions. A shapefile can have anywhere between three and nine files.
- The primary file extensions are .SHP, .DBF, .SHX. These three files hold the geometry and location of the data (.SHP), the attributes for each location (.DBF), and an index tying the two together (.SHX).
- These three files must be present for the file to be read correctly in GIS software.
- There are a number of other extensions, however, that may also be present, containing information about things like the projection (.PRJ), metadata (.XML), and encoding (.CPG).
Geodatabase
Another extremely common file form is the Esri File Geodatabase. They are one of the most common kinds of geodatabase and somewhat complex to work with in QGIS.
- First it’s important to note that if you look inside a folder with a .GDB extension, it is hard to make sense of the contents. There can be dozens or even hundreds of files, all with software-generated and non-descript filenames.
- These files are not particularly comprehensible to the human eye but can be interpreted when opened through a GIS software. They should not be manipulated in any way outside of GIS software.
- When opening the example file geodatabase in QGIS, there are three data layers represented by that large number of files. Note: If there is raster data stored in a File Geodatabase it can only be accessed through ArcGIS.
Geojson
GeoJSON is a format for encoding a variety of geographic data structures using JavaScript Object Notation (JSON). A GeoJSON object may represent a region of space (a geometry), a spatially bounded entity (a feature), or a list of features (feature collection). GeoJSON supports:
- Point
- Line string (LineString)
- Polygon
- Multi Point (MultiPoint)
- Multi Line String (MultiLineString)
- Multi Polygon (MultiPolygon)
- Geometry Collection (GeometryCollection)
Geospatial data is defined broadly in this format; anything with qualities that are bounded in geographical space might be a feature regardless of structure. It uses geospatial standards to streamline the data for web applications.
KML
Keyhole Markup Language was developed for usage in Google Maps and Google Earth. Originating as a community standard, this standard defines an XML language focused on geographic visualization, including annotation of maps and images. It is used to encode and transport representations of geographic data for display in an earth browser. Geographic visualization includes not only the presentation of graphical data on the globe, but also the control of the user’s navigation in the sense of where to go and where to look. https://www.ogc.org/publications/standard/kml/
Geotiff
One of the most common raster file formats is GeoTIFF, with file extension .TIF or .TIFF. This format is similar to other varieties of .TIF images, but with the important addition that it has information about where the data is located in the world. Sometimes this geospatial information is embedded within the primary file – in the header of the TIFF. Sometimes the information is stored in a separate file known as a “world file” (.TFW). There are a few other extensions that may also be present, storing supplemental content such as a lower resolution version of the data for faster display (.OVR) and metadata (.XML).
CSV
An extremely simple, and one of the most common formats for distributing geospatial information is just a spreadsheet organized by comma separate values (.CSV). If there are columns that contain geospatial information it can be displayed in a GIS. There are three key ways a csv file can be used in GIS:
- If the table has a Latitude column and a Longitude column, the data can be displayed with a geographic coordinate system, most likely WGS84. After it’s been displayed in can be saved and projected into an appropriate projection for the project.
- If the table has address, zip code, or even place name information, a locator dataset can be used to geocode the information based on the locator reference dataset.
- If the table has a key location field that is also present in a feature class, the table can be joined to the feature class. An example is a Census Tract table can be joined to a Census Tract Tigerline file based on a geoid.
File Organization System
Good file organization and naming are foundational data management practices, as they help you find files quickly when you need them.
Implementing a file organization system is the first step toward creating order for your research data. Well-organized files make it easier to find the data you need without spending lots of time searching your computer.
Everyone organizes their files slightly differently, but the actual organizational system is less important that having a place where all your files should logically go.
File Naming
File naming conventions are a simple way to add order to your files and help to find them later. Rich and descriptive file names make it easier to search for files, understand at a glance what they contain, and tell related files apart. This exercise guides researchers through the process of creating a file naming convention for a group of related files.
File naming rules:
- no spaces
- no special characters:
- special characters are used by systems for other purposes
- special characters include anything that is not alpha-numeric, except for an underscore, and sometimes a hyphen !@#$%^&*()+=.,~`, etc.
- a period is a special character reserved for parsing the file name from the extension type
- brief (fewer than 32 characters)
- meaningful: don’t accept default names or create arbitrary names consistent
- dates should be in ISO 8601, YYYYMMDD
- versions should be alpha numeric (e.g., v1, v2, v3) rather than using words like “final”
Consistent pattern for file naming, for example:
- component 1: project abbreviation
- component 2: type of object
- component 3: responsible team member initials
- component 4: date
- component 5: version
- pattern: prj_type_person_date_v.ext
- example: rhzone_map_20270801_v3.pdf (22 characters)
Storage
Data needs to be stored and backed up, but it can be frustrating to pick these systems and ensure that they are working correctly. Back up means that it’s in more than one location.
Local storage considerations:
- How much data will you have?
- Security; does your data need to be in HIPPAA compliant storage?
- Do you have access to a cloud storage platform (box, drive, dropbox, etc.)
- Who has access to the storage?
- Does it have automatic backups?
Documentation
Documentation has sometimes been called “a love letter to your future self” as it helps you remember important details about your research data. For project-level documentation we need a README.txt file and a data dictionary to ensure your documentation is of sufficient quality.
Readme file:
Data files living on a computer often need extra documentation for someone to understand what research they correspond to. In particular, it is useful to record the most basic project information and store it in the top-level folder of each research project. This can be done with a README.txt. The name, “README,” indicates that the file conveys important information and the file type, TXT, can be opened by many different software programs, making the content maximally accessible.
What to include in the readme file:
- brief description
- time period of collection
- contributors/project team members
- where are the data stored
- how and where are they documented
- file organization and file descriptions
- what other information will help you or someone else understand the project
Data Dictionary:
Ideally, a spreadsheet is formatted with a row of variable names at the top, followed by rows of data going down. This makes it easier for data to be used in any data analysis software (interoperability is a good thing) but makes it impossible to document a spreadsheet within the file itself. For this reason, it’s useful to create a data dictionary to describe the spreadsheet so that others can interpret the data. This exercise walks you through the major information you should record for each variable in the spreadsheet, adding up to a complete dictionary to accompany the spreadsheet file.
|
Question |
Example |
|---|---|
|
Variable name |
site |
|
Variable description |
Two-letter abbreviation describing the name of the overall site where the sample was collected. |
|
Variable units |
N/A |
|
Relationship to other variables |
Partner to variable “sampleNum,” which together define the sample ID (site name + sample number at that site). Related to variables “latitude” and “longitude,” which record exact coordinate location and are more specific than the larger site code. |
|
Variable coding values and meanings |
Coding values and meanings: BL = Badlands NP; DV = Death Valley NP; GT = Grand Teton NP; JT = Joshua Tree NP; ZN = Zion NP |
|
Known issues with the data |
Some Badlands samples were collected outside of the park boundaries; see latitude and longitude variables for specific locations. |
|
Anything else to know about the data? |
Older data (pre-2013) used one-letter abbreviations for site code but this was updated for clarity and ease of identification. |
Writing a Living Data Management Plan (DMP)
A DMP describes how data will be actively managed during a project and may be updated whenever necessary to reflect current data practices. A living DMP is a useful touchstone for understanding where data lives, how it’s labelled, how it moves through the research process, and who will oversee the data management.
What’s in a Living DMP?
- Short summary of the project: Provide a short section that provides contextual information, often this includes:
- Description of the problem
- The audience and your relationship to them
- Start-End Date
- What is the collection-storage-wrangling-analysis pipeline?
- Source of data collection
- Active storage location details
- Active storage location organization plan
- File naming convention?
- for raw files
- for clean files
- for analysis files
- for deliverables
- Documentation plan for active data and analysis methods
- Archival storage location details
- Project roles and responsibilities
- E.g. data manager: provides access to team members; ensures DMP is followed; provides templates for collection and documentation and reviews documentation
- E.g data collector: using guidelines and templates created by data manager to collect and document data.
- Any other relevant details to support the project
Exercises
Exercise 5: Create living data management plan, a directory structure and file naming convention
Start with a directory you use often. Leverage the best practices above to create a logical directory structure and a file naming convention.
Directory structure:
- Level 1:
- Level 2:
- Level 3:
File Naming convention
- Component 1
- Component 2
- Component 3
- Component 4
- Component 5
Example:
- Component 1: project abbreviation
- Component 2: type of thing
- Component 3: coverage data
- Component 4: modified by
- Component 5: modified date
- gisbc_map1_2020_jm_202302017
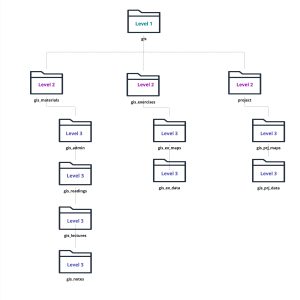
Illustration of a directory structure schematic
